Mark Sanger was our demonstrator for the October meeting.
His style varies from simple to very artistic and his first project was a bowl with a textured and coloured face and faux gold leaf centre.
He turned the back of the bowl leaving a chucking spigot for later. He then reversed it and faced it off being sure to leave a very good finish.
He then hollowed out a recess about 1/3 of the diameter and formed a bead around the edge of this and a groove close to the outer edge of the bowl. He then burnt these with piece of formica. The burning would stop colouring dyes to spread. Next
Mark textured the face using a Proxan rotary carving tool which he lightly sanded to get rid of the larger burrs before torching it to get rid of the rest. This done he stained it with a variety of water based stains which he dried with his small blow torch because he had forgotten to bring his hot air gun!!
Then comes the tricky bit, picking up the very thin pieces of foil. But first we need sticky stuff in the bowl and this was to be a mixture of acrylic paint and artists Gesso which he dabbed in to leave a mottled effect. Then he applied a coat of PVA size.
The foil was going to be applied in small pieces to give texture so first he cut the sheets of foil by laying it on a jewellers pad and used a very sharp craft knife. To pick the pieces up he smeared a small amount of Vaseline on the back of his hand and lightly greased a brush by swiping it over his hand and then dabbing it on to a piece of foil and transferring it to the bowl.
When sufficient pieces were in place they were lightly brushed out using a stroking movement then and sealed with acrylic sanding sealer. The textured area was then highlighted with gold acrylic paint using a very fine artist�s brush handled with a flicking motion, like ladies applying makeup. Really?!!!
And so on to project No2.
A spalted beech vase with a lid sitting on a stand.
Mark turned his blank to round with a chucking spigot and then mounted it in the chuck and turned it to the shape he wanted. Next he turned the end to a size he had decided on for the lid, drilled a small hole for the lid button to fit in to later and parted it off leaving a small witness shoulder as a guide for the lid.
Next he hollowed it out and formed a recess for the lid to fit following the witness to get close to the right size and create a jam fit in order to finish shaping the lid. This he did leaving only the button to make later.
The vase he took from the chuck and mounted it between a friction plate and a tail centre and finished shaping the bottom down to a tiny spigot to snap off. How small can you get it before losing it across the workshop?
So far so good. Nice. And now for the stand and no complicated carving here. First Mark turned a disc. Then he mounted a piece of wood in the chuck and turned a cylinder, cut a recess to a width to suit the disc and a few mm deep. Then he hollowed it out leaving a fairly thick wall slightly curved. This done and sanded he parted it off using the tail stock to catch it.
Then he hand cut through one side along the length and snapped it in half. Now he could cut it on the band saw in to as many legs as he wanted.
Three in this case.
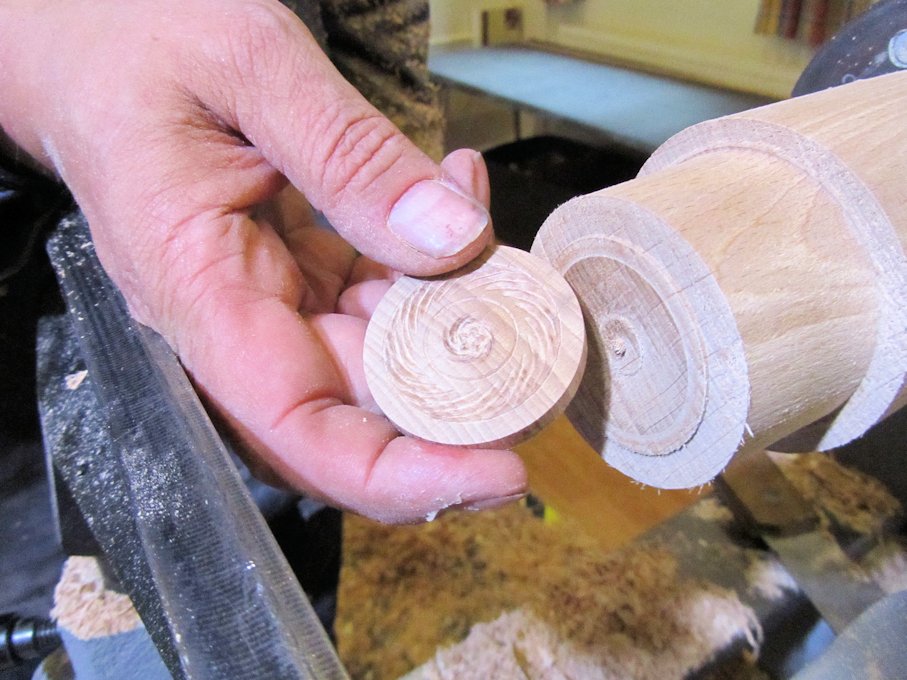
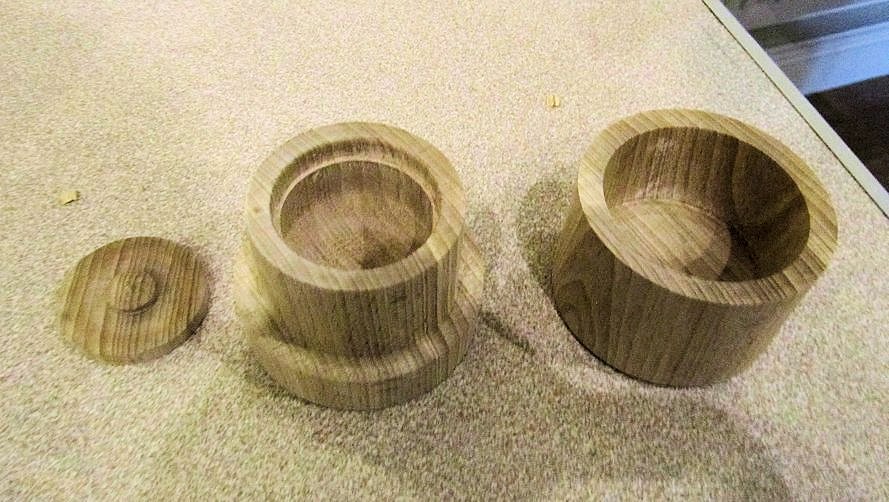
For his last piece Mark made a lidded box within a box. The top to the outer one was a vacuum fit. In other words the lid would slide down under its own weight without sticking.
He first turned his blank to round with a chucking spigot at one end only. Next he hollowed it out to around half the depth and parted it off. This would be the outer lid. With the remainder he turned the outer dia. to fit the outer lid, at this stage a jam fit so that top can be finished and hollowed it out with a recess to take the inner lid. The lid he made from a separate piece of wood with an integral button and reversed on to a jam chuck to texture the inside. With the lid a nice easy fit he sanded the inside. Next he turned the outside taking very fine cuts and checking it against the outer lid until he reached the fit he wanted.
A fine line between being too tight and too loose..
Once this was achieved he parted it off and reversed it on to a jam chuck to finish the base. Hopefully these three pics will help you understand wot I just wrote!!
|